At some point during your blogging career, you will most likely be working with brands. In the blogging world, bloggers have their version of a resume that you will need to submit to these brands. This resume is what’s known as a media kit. Media kits are a promotional tool that you will send to brands that you are interested in working with. It serves as a snapshot of your personal brand. It gives the brand a glimpse into who you are and what you can bring to the table. It is the deciding factor in whether the brand would want to work with you or not.
Creating a media kit is pretty simple and only requires you to update it as your social media or blogging stats change. If you haven’t created one yet, don’t worry because we are going to cover how you create one in this post.
CREATING AN ACCOUNT ON CANVA
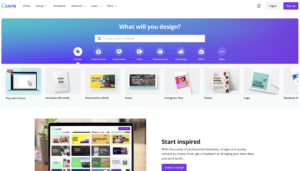
You will first need to create an account on Canva. This is one of the best sites to create a media kit because the site is completely free. You can upgrade to pro if you want more of their features, but it is not necessary to create an eye-catching media kit.
To create an account, you will hit the “sign up” button on the top right. If you already, have an account, just log in.
CREATING A MEDIA KIT
Once you have set up your account, you will hit the “create a design” button on the top right of the page.
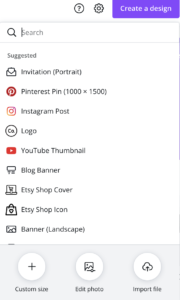
Here, you will be given an option to either upload a file, create a custom-sized photo, or enter in the type of picture you want to edit. I would go ahead and type in “media kit.”
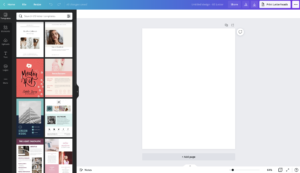
You will then be taken to a page with a plank document the size of a media kit. You can either create your own media kit from scratch or use one of the templates located on the left side.
DIFFERENT FEATURES

Templates
Creating a media kit on canva requires you to utilize these features listed above. As I have already explained, the “Templates” section is where all the canva-created templates are located. If you don’t feel that you are really creative and don’t want to waste time creating a media kit, then this is the perfect option for you. You would just click on one of the templates and edit it according to your specific needs.
Elements
The “Elements” section of the above menu has various graphics that you can add to your media kit. This is the section you can utilize to get more creative with your media kit. Some of the graphics give the option to change the colors to match the aesthetic of your personal brand.
Uploads
“Uploads” is where you can upload any pictures from your computer that you want added to your media kit. All of the pictures you add will be in the upload section and will stay there until you delete them.
Text
This section allows you to add text throughout your media kit. There are some pre-created text options and you can also customize your text with different fonts and colors.
Logos
This section is where you will upload your logo if you have one.
THE INFORMATION YOU NEED TO ADD TO YOUR MEDIA KIT
While your media kit needs to be eye-catching, the most important part of the media kit is the information on it. After you are done designing your media kit, you need to put the most important information about your personal brand. This includes a simple bio about yourself, your social media and website stats, and any brands you worked with.
I created a FAKE media kit, so that you all can get an idea of how a media kit should look.
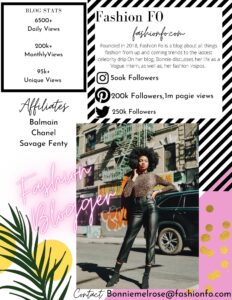
At the top of your media kit, you need to list the name of your brand or blog and your website url. You then need to create a brief bio about you and your personal brand. Under your bio, you can list all of your social media stats. This includes your follower count and percentage of engagement on each platform. Then, you will list your blogger stats. I would recommend listing your monthly views and total views on your site.
You also need to include any former brands that you worked with and your contact information. Your media kit doesn’t need to be as busy as the one above. It just needs to match your aesthetic. If you have a more clean aesthetic, then your media kit should represent that. In the video listed below, I created a media kit with a cleaner look. You can use either media kit for reference.





Great Guide! This is definitely helpful to me as a new blogger!
I’m so glad you found it helpful.